

A complete recipe guide — covering technique, timing, variations, and everything in between
“My grandmother made this every Thanksgiving without a written recipe. She eyeballed the butter, tasted the filling twice, and pulled it out of the oven right before the marshmallows turned from golden to burnt. It took me years to understand what she was actually doing — and this guide is the result of figuring it out.”

Sweet potato casserole with marshmallows is one of those dishes that people either grew up with or didn’t, and the divide is surprisingly passionate. For those who did grow up with it, it’s practically non-negotiable at Thanksgiving. For everyone else, it can seem puzzling — a savory vegetable covered in toasted marshmallows, served alongside turkey and stuffing.

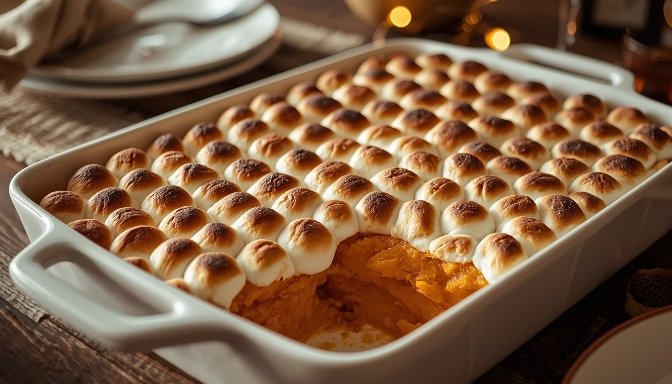
Done right, it makes complete sense. The sweet potato filling is earthy, buttery, and just sweet enough. The marshmallow topping melts slightly, toasts golden at the edges, and adds a sticky, caramelized layer that contrasts with the soft filling underneath. It’s rich and a little indulgent, and that’s entirely the point.
This guide covers the full method — baking versus boiling the potatoes, getting the filling texture right, timing the marshmallow topping properly, and a few ways to make it your own once you’ve mastered the base recipe.
Why This Dish Works (When It’s Done Well)
The combination sounds strange until you consider what it actually is: a warm, spiced sweet potato purée — essentially a dessert filling — topped with something that behaves like a brûléed meringue. The potatoes bring natural sweetness, earthiness, and a little starch. The butter and brown sugar in the filling add depth. The vanilla and cinnamon keep it grounded. And the marshmallows on top melt into each other, caramelize, and form a thin golden crust that pulls apart slightly when you serve it.
The version that gets ruined tends to have one of two problems: filling that’s either too sweet and one-dimensional, or marshmallows that were added too early and collapsed into a sugary puddle. Neither is hard to avoid once you know what to look for.
The key insight
The marshmallow topping should go on during the last 10–15 minutes of oven time, not from the beginning. Adding them too early means they’ll liquify completely and absorb into the filling. You want them to melt just enough to fuse together and toast on top — not disappear into the dish.
Choosing the Right Sweet Potatoes
This matters more than most recipes admit. Not all sweet potatoes are the same, and the type you choose will affect the flavor, color, and texture of your filling.
Garnet and Jewel sweet potatoes
These are what most grocery stores in the US sell as “sweet potatoes.” They have reddish-orange skin, deep orange flesh, and a moist, naturally sweet interior. They’re ideal for this recipe — they mash smoothly, taste great with brown sugar and butter, and hold their color beautifully after baking. If you see a bag simply labeled “sweet potatoes” at a regular supermarket, it’s almost certainly one of these varieties.
Japanese sweet potatoes
These have purple skin and pale, cream-colored flesh. They’re drier and starchier, with a slightly nuttier, less sweet flavor. They work in this recipe but produce a pale filling that looks a little unexpected. Some people actually prefer the more subdued sweetness — it balances the marshmallow topping better for those who find the traditional version too sweet.
Hannah sweet potatoes
Tan skin, white-yellow flesh, mild flavor. Similar to Japanese in texture — drier and less intensely sweet. Again, usable but unconventional for this dish.
For a first attempt, or whenever you’re making this for a crowd, stick with Garnet or Jewel. The orange flesh is what people expect, and the flavor profile lands exactly where the recipe needs it to.
A note on labeling
In the US, sweet potatoes and yams are frequently mislabeled at the grocery store — what’s sold as a “yam” is usually a sweet potato (Garnet or Jewel variety). True yams are a different plant entirely, less sweet and much starchier. For this recipe, reach for the ones with orange flesh regardless of what the sign says.
Baking vs. Boiling the Potatoes
This is a genuine fork in the road, and both methods have real advantages. The one you choose will affect both the flavor of the filling and how much work you’re doing.
Baking (recommended)
Wrap each potato in foil or place them directly on an oven rack at 400°F (200°C) for 45–60 minutes until very soft. Baking concentrates the natural sugars through caramelization — the flesh gets slightly denser and develops a deeper, more complex sweetness than boiled potato. It also produces a drier mash, which gives you more control over the filling texture. You’re adding butter and sometimes cream anyway, so starting from a drier base is an advantage.
The downside is time. If you’re making this on a busy Thanksgiving morning, waiting an hour for the potatoes to bake can be inconvenient.
Boiling or steaming
Peel and cube the sweet potatoes, then boil for 15–20 minutes until soft. This is faster and perfectly fine. The flavor will be slightly more muted — you lose some of the natural sugar concentration that baking provides — but honestly, with butter, brown sugar, vanilla, and spice in the filling, most people won’t notice the difference. The bigger concern with boiling is water retention. Make sure to drain very thoroughly and let the cubes steam dry for a few minutes before mashing. Watery filling is the main failure mode here.
If you’re short on time or oven space (very common at Thanksgiving), boil them. If you have the time and a spare oven rack, bake them.
The Full Recipe
Sweet Potato Casserole with Marshmallows
Serves 8–10 | Prep: 20 min | Cook: 30 min | Total: ~1 hr (plus potato baking time)
For the filling
- 1kg (about 2.2 lbs) sweet potatoes
- 4 tbsp unsalted butter, softened
- ¼ cup brown sugar (packed)
- ¼ cup whole milk or heavy cream
- 2 large eggs
- 1 tsp pure vanilla extract
- ½ tsp cinnamon
- ¼ tsp nutmeg (freshly grated if possible)
- ¼ tsp salt
For the topping
- 3 cups mini marshmallows
- (or regular marshmallows, halved)
Step-by-Step Method
- Cook the sweet potatoes. Bake at 400°F (200°C) for 50–60 minutes wrapped in foil, or boil peeled cubes for 15–20 minutes until completely tender. Let them cool enough to handle.
- Preheat your oven to 350°F (175°C). Lightly butter a 9×13 inch baking dish (or equivalent).
- Make the filling. Scoop the baked potato flesh from the skins (or use the boiled cubes) and place in a large bowl. Mash thoroughly — or use a hand mixer on low for a smoother texture. Add butter while the potatoes are still warm so it melts in evenly.
- Add the remaining filling ingredients. Mix in the brown sugar, milk or cream, eggs, vanilla, cinnamon, nutmeg, and salt. Stir until everything is combined and the mixture is smooth. Taste it — this is the moment to adjust. More salt? A touch more sugar? A little more cinnamon? Fix it now, before it goes in the oven.
- Transfer to the baking dish. Spread the filling evenly. Bake at 350°F for 20–25 minutes until the filling is set and slightly puffed at the edges.
- Add the marshmallows. Pull the dish from the oven. Scatter the mini marshmallows evenly across the surface in a single layer — don’t pile them too thick or the bottoms won’t toast. Return to the oven for 10–15 minutes, watching closely. You want them golden-brown and puffed, not melted flat or burnt. Every oven runs differently, so check at 8 minutes.
- Rest briefly before serving. Let the casserole sit for 5 minutes after it comes out. The marshmallow layer firms up slightly as it cools, making it much easier to serve without the topping sliding off in one piece.
Watch the marshmallows
The window between perfectly golden and burnt is genuinely about 2–3 minutes. Stay near the oven for the last stretch. If your oven runs hot, check at 7 minutes. A light golden color across most of the surface with some deeper caramel spots is exactly what you’re going for.
Getting the Filling Texture Right
The filling is what separates a great sweet potato casserole from a forgettable one. The goal is smooth, creamy, and cohesive — not grainy, not runny, not stiff.
Mashing method matters
A potato masher gives you a slightly rustic texture with small bits. A hand mixer on low gives you something smoother and more uniform. A food processor will give you the smoothest result, but it can turn starchy and gluey if over-processed — a risk that’s lower with sweet potatoes than regular ones, but still worth being careful about. Most people use a hand mixer or masher. Either works well.
The eggs might surprise you
Some recipes skip the eggs entirely. Eggs are what transform the filling from a side dish texture into something that sets and holds when baked — more like a soufflé or custard than mashed potatoes. Without them, the filling stays soft and can become watery as it bakes. With them, it firms up slightly, holds its shape when served, and the surface develops a slight skin that contrasts nicely with the marshmallow layer above.
If you’re making this for someone with an egg allergy, you can leave them out. The dish will still taste good, just a little softer in structure.
Don’t over-sweeten the filling
This is the most common mistake. The filling should taste mildly sweet — pleasantly so — not like a dessert on its own. Remember that the marshmallow topping adds significant sweetness on top of whatever’s in the filling. A quarter cup of brown sugar for roughly a kilogram of sweet potatoes is the right general ratio. If your sweet potatoes are very naturally sweet (which happens with Garnet varieties in their peak season), you might want even less.
Variations Worth Trying
Streusel topping (or half-and-half)
A brown sugar and pecan streusel topping is common alongside (or instead of) marshmallows. Some families do half marshmallows, half streusel — one end of the dish each. The streusel adds crunch and a nutty note that some people prefer. To make it: combine ½ cup flour, ½ cup brown sugar, ¼ cup cold butter (cut into pieces), and ½ cup chopped pecans. Work it with your fingers until it clumps, then scatter over the filling before baking. No need to add it late — unlike marshmallows, streusel goes on from the beginning.
Adding orange
A tablespoon of fresh orange zest and a splash of orange juice in the filling adds a brightness that cuts through the richness nicely. It’s subtle — nobody will necessarily identify it as orange — but the filling tastes more alive and less one-note. Worth trying once you’ve made the base version.
Boozy version
A tablespoon or two of bourbon or dark rum stirred into the filling before baking adds a warmth and complexity that pairs very well with the brown sugar and spice. It cooks down during baking, so the alcohol itself isn’t really a factor — it’s the flavor that remains. Common in Southern US versions of this dish.
Dairy-free adaptation
Swap the butter for vegan butter or refined coconut oil, and use full-fat coconut milk instead of regular milk or cream. The coconut flavor is detectable but not overwhelming — it actually complements the sweet potato and spice well. Use vegan marshmallows (they exist and toast similarly to regular ones).
Make-Ahead Tips
This is one of the best dishes to make ahead, which matters a lot at Thanksgiving when oven space and mental bandwidth are both limited.
The filling can be made up to 2 days in advance. Prepare it fully, spread it in the buttered baking dish, cover tightly with plastic wrap or foil, and refrigerate. On the day, pull it out about 30 minutes before baking to take the chill off. Then bake as directed, adding the marshmallows in the last 10–15 minutes as usual. It may need an extra 5 minutes in the oven since it’s starting from cold.
Don’t add the marshmallows in advance — they’ll absorb moisture from the filling overnight and turn soggy. Always add them fresh, right before the final bake.
Reheating leftovers
Reheat covered with foil at 325°F for 20–25 minutes. The marshmallow top won’t look quite as good the second day, but the flavor holds up well. A few minutes under the broiler (uncovered, watching closely) can revive the topping somewhat.
Common Problems and How to Fix Them
Filling is watery or soupy
Almost always caused by excess moisture in the sweet potatoes. If you boiled them, they may not have been drained thoroughly enough. Fix: before mixing in the other ingredients, put the mashed potato in a saucepan over low heat and stir for 3–5 minutes to drive off steam and excess moisture. It’ll tighten up quickly.
Marshmallows melted flat and disappeared into the filling
They went in too early or the oven was too hot. There’s no fully fixing this mid-cook, but you can add a fresh layer of marshmallows on top and give it another 10 minutes. The filling underneath might be a little sweeter than intended, but the dish will still be fine.
Marshmallows burnt on top, filling barely warm
The oven was too hot, or the dish was too close to the top heating element. Move the rack to the middle position and lower the temperature slightly. If your oven has a tendency to run hot, bake the filling at 325°F instead of 350°F, and watch the marshmallow stage closely.
Filling tastes flat or one-dimensional
Under-seasoned. Sweet potato filling needs more salt than most people expect — it’s what makes the flavors pop rather than sit flat. Taste the filling before it goes in the dish and add salt in small increments until the sweetness becomes more pronounced and alive, not just sweet. This is counterintuitive but it works.
Serving and Pairing
Sweet potato casserole is almost exclusively a Thanksgiving and holiday side dish in American cooking, where it tends to appear alongside roast turkey, stuffing, green bean casserole, cranberry sauce, and gravy. Its sweetness plays well against the salty, savory elements on the plate.
Some families serve it as a side dish; others treat it practically as a dessert course. There’s a reasonable argument for both positions. If you’re serving it alongside stuffing and mashed potatoes, it can feel like too much starch — in that case, keep the portion sizes smaller or lean into it as a sweet component that replaces a dessert rather than competing with two other starches.
It also works at non-holiday meals. Alongside roast pork or glazed ham, it’s genuinely excellent. With roast chicken it’s a little unexpected but not wrong. It’s really the marshmallow topping that keeps it holiday-adjacent — without that, it’s close enough to a savory mash that it could appear year-round.
A Brief History of the Dish
Sweet potato casserole with marshmallows is distinctly American, and relatively recent in the wider context of cooking history. The combination became popular in the early 20th century — marshmallow manufacturers actively promoted recipes using their product as a cooking ingredient, and the pairing with sweet potatoes appeared in home economics booklets and promotional recipe cards from the 1910s onward.
It took hold particularly in Southern US cooking, where sweet potatoes had long been a staple crop, and eventually became embedded in the Thanksgiving tradition nationwide. What started as a marketing effort became, within a generation or two, something people genuinely associated with home, family, and the holidays.
That context doesn’t make it less worth making. It makes it interesting — a dish with a traceable, unsentimental origin that became genuinely beloved through repetition and association. Most comfort food has a story like that, if you go looking.
Quick Reference: What Actually Matters
- Use Garnet or Jewel sweet potatoes — orange flesh, moist and naturally sweet
- Bake the potatoes rather than boiling if you have the time — better flavor and drier texture
- Don’t over-sweeten the filling — the marshmallows add a lot of sweetness on top
- Include eggs in the filling — they help it set and hold structure when baked
- Season with enough salt — it’s what makes the sweetness taste complex instead of flat
- Add marshmallows only in the last 10–15 minutes, not from the beginning
- Watch the marshmallow stage — the window between golden and burnt is short
- Make the filling up to 2 days ahead; add marshmallows only on the day
That’s the whole thing, really. The recipe has few ingredients and straightforward technique. Most of the craft is in the timing and the seasoning — and both of those improve quickly with a single practice run.
Suggested Authority References
- Wikipedia: Sweet Potato
Placement: Under “Choosing the Right Sweet Potatoes” — provides botanical and varietal background for readers curious about the difference between Garnet, Jewel, and other cultivars, as well as the common confusion between sweet potatoes and yams. - Wikipedia: Marshmallow
Placement: Under “A Brief History of the Dish” — supports the historical context around marshmallows being promoted as a cooking ingredient in the early 20th century, and adds credibility to the origin story without requiring external blog citations. - USDA National Agricultural Library: Human Nutrition & Food Safety
Placement: Under “Choosing the Right Sweet Potatoes” or as a footnote to the nutritional properties of sweet potatoes — a trustworthy government resource that signals factual authority around food and ingredient information without leaning on commercial sources.